Tuesday 3 March 2015

Book review: The Girl in the Red Coat by Kate Hamer

I am clearly the world's worst blogger. I'm not going to beat myself up about it, I'm just going to post when I feel like it and after finishing this book last night, I felt I wanted to write something about it.

***

The Girl in the Red Coat by Kate Hamer

I was initially drawn to this book because I thought it was going to be a reworking of Little Red Riding Hood and retold fairy tales are my jam.  While the book has fairy tale tones to it, it is certainly not that story.  However, it is beautifully written and incredibly engaging so I wasn't at all disappointed.


It is difficult to say too much about the story without spoiling it.  Not that this is necessarily a book with twists and turns, but I think the story is better left to unfold naturally.  This is a novel about a little girl who goes missing, but it is not a straightforward mystery and does take somewhat of an unusual direction.

It's a novel about mothers and daughters, about the threads that weave through lives, that connect us with each other and with the world around us. It's the story of two strong women and what happens to each of them when they are separated. It's also about connections, relationships and community.  There is recurring imagery of webs, lines, threads, the ties that bind. In some ways I feel it draws from mythology; the Furies spinning out the cords of our lives.

The story is told from two perspectives; Beth, the mother and Carmel her eight year old daughter. I often find dual narratives irritating or confusing, especially when they are both first person, but it really works here for two reasons. Firstly, Beth speaks in past tense and Carmel in present and secondly, each voice was so distinctive that I never had trouble telling them apart.  Both characters are interesting and I really enjoyed getting inside their heads.


I read the whole thing over two days, partly because I was going to see Kate Hamer speak but also because it's very compelling. I'm a "guesser" and it isn't often that I can't see where a book is going even if the journey is still enjoyable. However, even with only 50 pages to go I still wasn't sure how this would end.  I didn't have time to read the whole book  before the event but afterwards I stayed up until I finished it. This really is an excellent novel, and I'm sure Kate Hamer is going to be one of my favourite authors.

Saturday 17 August 2013

Snail Mail

So, in the last post I mentioned having joined The League of Extraordinary Pen Pals.  I am also a member of International Geek Girls Pen Pal Club, Postal Society and the Letter Writers Alliance.  I've rekindled my love of letters and sending and receiving snail mail!

I wanted to share a few pictures of some of the mail I have sent and received over the past few months.


This is three letters that I sent out in July and this was the first time I had really used washi tape to decorate envelopes, so I kept it pretty simple.


This was all the mail I received in the last week of June - a lot of postcards from LEP members and a few letters.  I used a map of Braavos from the Lands of Ice and Fire collection of maps as the background because I thought it looked really good. (If you're a map geek and love A Song of Ice and Fire you should check it out!)


 These are some postcards I sent out at the start of July.  The patterned ones are from Alice Apple on Etsy and are exactly the kind of patterns I love.  The owl card is Paperchase and the two Art postcards are from Willowing.  I absolutely adore them - I even put three of them in a frame and ordered another set a couple of weeks later.   I'm planning on buying a bigger print as well.


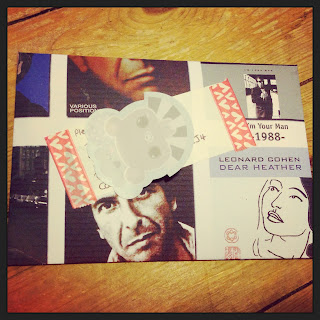
These are all envelopes that I made.  The top set are made from scans of the Leonard Cohen 2013 tour book, which is amazing (much like the show was.)  The others are made from different sizes of craft paper.  In all the cases I made templates from cardboard and drew round them.  It's a fairly addictive pastime.


This is one of the Leonard Cohen envelopes ready to send.


And this is one of the other envelopes ready to post.

I don't always remember to photograph my incoming and outgoing mail, but I'm going to try and be better at it. :)


Tuesday 13 August 2013

Belle Wrap - free pattern

Hello again!

I've decided, inspired by some of the amazing mail blogs that some of my new friends in the League of Extraordinary Pen Pals have, to try and be a little better at blogging. :)

I'm planning on including some mail-related posts in the future, but for now I'm going to stick to a few of the posts that I've had on the back-burner for a long time.

First up is a free pattern that I've been meaning to post since around ... January... Yeah, I know.

I made this wrap for my friend for Christmas so it's named after her. It has not been tested yet, so if you find any errors then please let me know. It's based on a stitch pattern I found in a vintage lace book.


Belle Wrap

Worked in a webbed lace stitch either side of a base chain, this can be as wide as you want it - this is shawl width but working fewer repeats will leave you with more of a scarf width.

After the set-up row, it's just a single row repeat, so really good for when you've got one eye on the TV.

200g of DK weight yarn.
5mm hook.

Centre chain - CH 228. (Increase or decrease in multiples of 7)

R1 1dc into 5th chain, *2ch, skip 5, 4dc in next ch, ch2, dc in next ch. Repeat this across the row ending with 4dc into the last ch.

R2. Ch4 dc in same stitch, ch2, skip ch2space and dc, (4dc, 2ch, 1dc) in next ch2 space. Ch2, skip next 4dc, ch2 space and dc, (4dc, 2ch, 1dc) in next ch2 space. Continue across ending with 4dc in top of beginning 4ch.

R3-12 - repeat row 2. (Repeat R2 until the wrap is around half the width you want it to be. The one I made is 12 rows either side of the chain.)


Second side. Rejoin yarn with a slip stitch to the other side of the starting chain, beginning at the end of the first row - so underneath the last 4dc.

Repeat the pattern again, making sure to finish on the same number of rows as the first side.


Edging.
At the end of the last row, ch1 and work down the short edge of the wrap. 3sc in the edge of each dc and 3sc in each of the turning chains for each row.
At the end of the short edge, ch1 and continue along the length of the wrap with 1sc in each dc and 2sc in each ch2 space.
At the end of the long side, ch1 and continue around the short side as before.
At the end of the short side, ch1 and work along the last long side, ending with a slip stitch in the ch1.
Finish off. Weave in all the ends.
Block to open up the lace

So, that's it. Enjoy.  If you make this, please link to it on Ravelry - I love seeing pictures! :D


Friday 2 November 2012

A few things that I have made this year

So, it seems that I am as rubbish as ever at keeping this up to date. I guess blogging just isn't really my thing. I used to write in a journal almost every day and since I stopped doing that I think that I've just got out of the habit.
I have made a few bits and bobs this year that I wanted to show. This isn't everything, of course, but just some of the things that I'm most pleased with, or are the most unusual.

Firstly, this is a Chanson en Crochet capelet (pattern available free on Ravelry)
I found the pattern a little tricky because of the errata, which are freely available, but flicking back and forth between the two was challenging. It's made with about half a 400g cone of aran acrylic. I added an extra row before the border, which in retrospect I didn't need. I made another one in mint green acrylic for a friend but I can't find a photo of that one.

Next up is a teal Coral Capelet from Edie Eckman's book. I found this really difficult, but mainly because I didn't read the pattern properly! It's made from a teal/petrol smoothie acrylic.

I also made myself a hat and mittens set based on Wonder Woman's costume! I'm really pleased with these. They're made from acrylic dk.

Next up is a cowl I made from bamboo/cotton mix dk. It's not as long as I'd like as I only had one skein of it, but I'm pleased with the way the stitch pattern turned out.

Chris asked me to make him some gloves like CM Punk's. I think they turned out okay. I used surface crochet for the crosses, which is a technique I've not tried before, but I followed a tutorial online. (I can't remember where I found it, just google)
Last is a red hooded cape that I have been working on for months and months! I finally finished it on halloween, which is quite apt although it's not actually intended as a costume! I couldn't find a pattern that was exactly what I was looking for so I ended up just making it up as I went along, which involved an awful lot of frogging! I think in the end I started it seven or eight times, got halfway through and then pulled it back. I put it down for a few months and then went back to it. It's made with 400g of aran acrylic with literally nothing left over. I even had to redo the last row in a tighter tension to have enough yarn to finish it! I am really happy with it, though. In the last picture the part of the wolf is played by Colin.;D

Wednesday 18 April 2012

Update (long time coming)

Well, what a year it's been. I have spent a long long time trying to work out what to do with this blog and how to start anew. In the end I have decided that what does it matter? It's a blog. It can be whatever I want it to be; I don't have to follow rules. I don't even think there are rules.

So, as mentioned in a previous post, I had been a vegetarian for over 20 years. During the last maybe ten years I had become lazier and lazier about it. I never ate anything that wasn't vegetarian, or anything like that, but I had started wearing leather shoes again and had become lax about checking for non-tested cosmetics. Then around three years ago, I started to develop an intolerance to milk and made the switch to soya milk, but still ate other dairy products. But as time went on I looked into veganism more and more and started to think about it as something I could work towards. I began a couple of years ago by having two days a week when I would avoid all dairy products and eggs as well as continuing to be vegetarian. As of January 2011 I have been eating 100% vegan all the time.
I spent the first year getting rid of all my 'pre-gan' shoes, bags and toiletries. I also thought long and hard about wool. For anyone who doesn't know, vegans don't eat or use ANY products that come from or are produced by animals. I wasn't sure what to do about my stash. Like most crocheters, I have built up a ... well, 'massive stash' sounds bad, but that's kinda what it is. Having spent a lot of time, not to mention money on various types of yarn including wool and wool mix ones, I wasn't immediately sure if I could just get rid of it all. Since becoming vegan I have not bought any yarn containing any wool, but I decided not to get rid of all of my stash yarns that contain wool straight away. I went back and forth a lot, in my mind trying to establish my own line about what I would and wouldn't do. In the end I have given away almost all of my wool/mix yarns to various charitable causes - the organisation where I work has a weavery and much of it went there. Other yarns I have used to make items and they have been given away to various non-vegan friends, family and charities. Some are still to be found homes, but they will eventually all go.

So, having a shop selling wool items and a blog showing wool items doesn't really fit with my new lifestyle. I wasn't sure what to do about this blog. I wanted to start a food blog about all the new stuff I am cooking and eating but also, I still crochet a lot and make other bits and bobs so I wanted to still have somewhere to talk about that. I thought about shutting this blog down and just starting another one, but since I have been so lax about making entries here I thought starting again would be too hard. So for now, this is it. Sometimes I might write about crochet, sometimes I might write about food, and sometimes I might leave it empty for months at a time.

I've been working on a few patterns to share, so my aim is to get one of them up in the next month. I've also been playing with felt (polyester of course!) and have made a couple of things that I'll show another time.

Take care.

Tuesday 5 April 2011

George Shawl Pattern

It has been a looooong time since I updated here. There has been a lot going on for me, some of which I will explain in another post.

For now, however, I am just offering up a free shawl pattern that I designed last year. It's a simple pattern, perfectly suitable for beginners, I think.

The pattern will be linked up to Ravelry, if you're on there. If you would like a PDF of the pattern sending to you then email me at badschnoodles (at) g mail (dot) com and I'll send it to you. If you'd rather print it out yourself then just cut and paste into your choice of documents.

So here's the pattern, with all original notes. It has been tested but if you find an error or have any questions then please let me know.


George Shawl


I designed this simple shawl as a mum-to-be gift for my friend. I wanted her to have something that was light enough to wrap up baby, but big enough to throw round her shoulders during a night-time feed. It also needed to be machine washable and easy-care!


The shawl is made really simply in filet crochet style. Once the pattern is set up there are just three rows to repeat and the way the stitches are laid out means that you should always be able to see what the next stitch should be – ideal for beginners and working on the go!

You can use any yarn and a hook to compliment it for this pattern and gauge isn’t too important. If you want the shawl to have more drape then I would recommend using a hook size slightly larger than recommended. The shawl pictured was made in baby 3-ply using a 4mm hook.


Pattern

Pattern uses US terms.

*the turning chain does NOT count as a stitch*


R1. Make a magic circle. 10DC in ring, join with a slip-stitch (10)


R2. Ch2. 2DC in first 5DC. Ch2. 2DC in next 5 DC. DO NOT JOIN (10dc, 2ch, 10dc)


R3. Ch2 turn. 2DC in DC *Ch1, skip 1 DC, 2DC in next DC* Repeat * * to the ch2 space. 2DC ch2 2DC in ch2 space. *ch1, skip 1 DC, 2DC in next DC* to end. (2dc 1chsp x5, 2dc ch2 2dc in point, 1chsp 2dc x5)


R4. Ch2 turn. 2DC in first DC, DC in next. *ch1, skip ch1 space, DC in next 2 DCs* repeat to ch2 space, (2dc, ch2 2dc) in ch2 space *ch1, skip ch1 space, DC in next 2 DC* until end. 2DC in last DC.


R5 – PATTERN ROW A – Ch2 turn. 2DC in first DC, DC in next 2 *ch1, skip ch1 space DC in next 2* repeat to point. (there will be 4DC before and after CH2 space – DC in first 2, Ch1, skip 1, DC in next) (2dc ch2 2dc) in ch2 space, DC in first DC, ch1, skip 1, DC in next 2 DC. *ch1, skip ch1 space, DC in next 2* repeat to end. 2DC in last DC.


R6 – PATTERN ROW B – Ch2 turn. 2DC in first DC. Ch 1, skip 1dc, DC in next 2 DC *ch1, skip ch1space, DC in next 2 DC* repeat to point. (There will be 3 DC before and after ch2 space – DC in first 2, ch 1, skip 1) (2DC ch2 2DC in ch2 space) Ch1, skip next DC, DC in next 2 DC *ch1, skip ch1 space, DC in next 2* repeat pattern to end with 2DC in last DC.


R7 – PATTERN ROW C – Ch2, turn. 2DC in first DC, DC in next. *Ch1, skip ch1 space, DC in next 2 DC* repeat to point. (there will be 2DC before and after ch2 space Dc in each) (2DC ch2 2DC) in Ch2 space. 2DC in next 2 DC. *ch1, skip ch1 space, DC in next 2 DC* repeat to end with 2DC in last DC.


Repeat pattern rows A B and C until the shawl is the desired size.


Edging


Ch1. Working along the edge, 2HDC in the side of each DC. 2HDC in corner. Continuing around HDC in each DC, 2HDC in each Ch1 space, 3HDC in point, continue to start, 2HDC in corner, join with a slip stitch to first HDC . Finish off and weave in the ends.


Wednesday 10 November 2010

Folksy Friday Stars

This week's Folksy Friday is all about stars. I love star shapes all year round but at Christmas time I think they are particularly apt!


Hammered silver necklace by Dream of Silver
I love this simple, pretty necklace. I don't wear a lot of jewellery (although I do own quite a lot) but when I put a necklace on it tends to stay on for quite a long time. This is the kind I really like; it will go with anything and become a real signature piece.


Glass by Poulsom Glass Painting
Oh I think this glass is beautiful! I have looked through this shop so often! How I would LOVE to drink my Christmas tipple from one of these!


Glass bowl by Lazy Daisy
This is so pretty and there are coasters available too! I think it would look lovely piled high with mince pies! (And I don't even like mince pies!)


You're A Star Birthstone necklace by Poppy Sparkles
This is a lovely gift and it can be personalised with the recipient's birthstone. Poppy Sparkles also has a gorgeous snowflake necklace in the same style, but this week I am posting stars!


Little Ninja Companion by Lilley's
These little Ninjas are so cool and this one's holding a star! I can imagine that once you start buying these they will become quite collectable.

I know it's a bit gauche including my own items here... but I'm quite proud of these and I just noticed that they fit the theme so I'm risking it!


Yin Yang Star Mitts by Badschnoodles

So that's it for this Folksy Friday. I hope you see something you like! :)

In other news, I have a few lovely fellow Ravellers very kindly testing a shawl pattern that I wrote! They are from as far afield as USA, Sweden and Australia! It makes me feel quite cosmopolitan! (Or is that 'feel like having a cosmopolitan!?)
When it's finalised I will be posting it here so watch this space... ;)


BlogBooster-The most productive way for mobile blogging. BlogBooster is a multi-service blog editor for iPhone, Android, WebOs and your desktop